Gardening Jobs for March

Garden Designer Lucy Willcox

Written by: Ashley Edwards

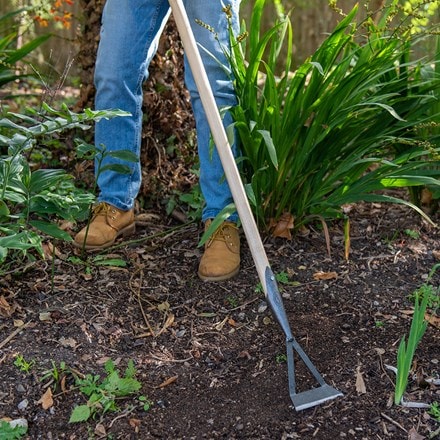
Three jobs for March in the garden

March heralds the beginning of spring, and one of my favourite times of year. Buds burst into life and birds begin to nest, but don’t be fooled, nights can still be chilly so protect tender plants and don’t get caught out by late frosts.

Favourite plants for a shady border

Shade can often be seen as a problem in the garden, but it opens up so many opportunities for planting that couldn't survive in full sun. Here are a few that I like to use:

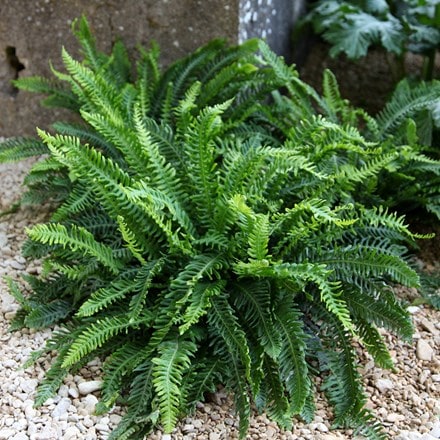
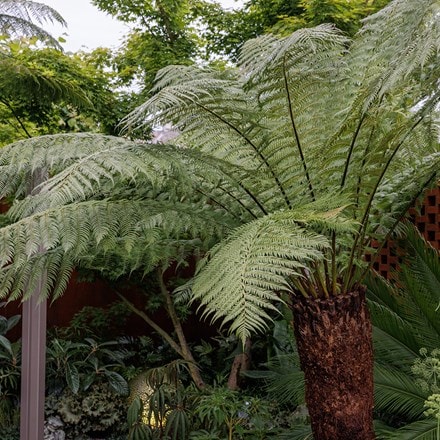
Blechnum spicant (hard fern) — there are so many ferns to choose from but I love this one. A gorgeous evergreen fern with toothed fronds that add great texture and provide contrast to other plants. It copes surprisingly well with short periods of drought, once established.

Digitalis (foxglove) is a classic plant for a shady border. Many foxgloves are biennial and will self-seed if the conditions are right. They look like fairytale spires and match well with ferns and other woodland plants.

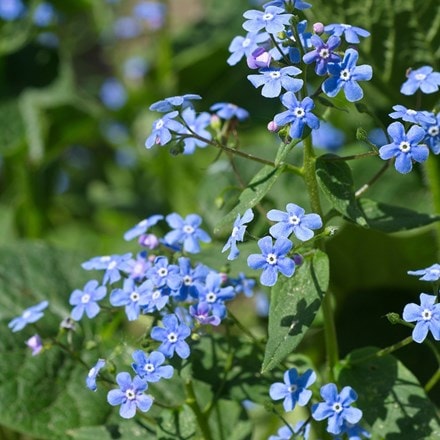
Brunnera macrophylla ‘Looking Glass’ (Siberian bugloss) — the almost completely silver, rounded leaves of this plant provide ground cover whilst the dainty blue flowers dance above; they are reminiscent of forget-me-nots. This cultivar is especially good mixed with other woodland plants, and the foliage continues to provide interest even after the flowers are finished. Easy to look after and surprisingly tough once they are established, they make fine additions to the shady border.

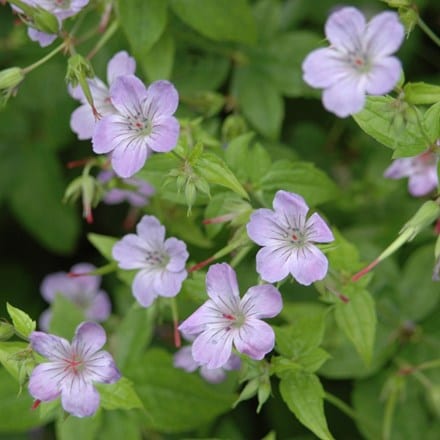
Geranium pratense 'Mrs Kendall Clark' (meadow cranesbill) prefers light shade, but the pearly grey flowers will go on through May and June. If you cut back this hardy geranium after flowering, you’ll likely get another flush of flowers.

Athyrium otophorum var. okanum (eared lady fern) — quite a large fern, growing up to 80cm eventually — this will help to fill out those shady corners. The light yellow/green fronds help to illuminate an area, and the purple stems provide excellent contrast. The old fronds can be cut back in early spring to make way for the fresh new growth.

Plants made for shade

Potting on and hardening off bedding plugs

Plug plants are a cheap and easy way to get your summer annuals off to a good start, especially if you don’t have room for seed sowing. Once your plug plants arrive, you’ll want to pot them up into 9cm pots with a peat-free multipurpose compost. This is important as a large pot makes it more likely that the plant’s small roots could drown, it’s always better to start off small and work your way up.

Keep your newly potted plants well-watered, but not standing in water, in a bright, frost-free location. You could put them on a windowsill in an unheated room or conservatory. As your plants grow, you can pinch out the tips of stems, back to a few pairs of leaves, to encourage a bushier form and more flowers.

Before you move your plant outdoors, it’s important to put it through the hardening-off process. Air movement, temperature changes, and low humidity can have adverse effects, and plants grown indoors or under glass can go into shock if suddenly placed outside. The hardening-off process allows your plant to develop sturdier stems and thicker leaves, protecting it from the elements.

Hardening-off usually takes two to three weeks. Hardy plants usually settle in and adjust to new conditions more quickly than half-hardy or tender plants, which tend to need a bit more warmth and protection to get going. Start by moving your plants into a cold frame or unheated greenhouse. Leave your structure ventilated during the day and closed at night for the first week, and then left ventilated at night in the second week (unless frost is forecast).

If you don’t have a frost-protective structure, you can place your plants in a sheltered position in the day (preferably on a south-facing wall) and bring them in at night. You may need to protect them from sun-scorch by using fleece blankets during the day. Do this for two weeks, then you can remove the fleece during the day but cover at night. At the end of the third week, you can leave them uncovered before planting out.

You can plant out your tender plants once any risk of frost has passed, by which time they should have strong roots and look stocky. If there is a late frost forecast, you can cover your plants with fleece. If your plants get slightly damaged by wind or frost, you can cut off the affected area and these will normally recover and grow back.

Potting & propagating

Potting & propagating

Shop now

Plant protection

Plant protection

Shop now

Preparing your borders for planting

When it comes to planting your borders, the key is in the preparation of your soil. This is best done in autumn or spring.

Remove perennial weeds

When establishing a new planting area in your border, remove any perennial weeds, like bindweed, that will smother your new plants. If you have a large space, it would be beneficial for pollinators to leave some perennial wildflowers like toadflax and dandelion, they can also provide colour in the garden if kept in check.

Dig over

The old way of gardening (and the way I was taught!) was to double dig everything whilst incorporating compost. Studies have since found that this can actually destroy soil structure and disrupt the microbiome. You’ll also bring weed seeds to the surface, making extra work for yourself further down the line. You should only dig over your border if the soil is very compacted. If this is the case, insert a border fork into the soil and push back and forth to open up the soil structure, rather than digging and turning over.

Add organic matter

This will help to improve fertility and water retention in your border. I don’t add compost to the planting hole as the roots of the plant can end up sitting in it and the plant can sink as it decomposes.

Instead, I add a layer of organic matter (garden compost, leafmould or bark, depending on the plant) and this will be incorporated into the soil by the microbes and invertebrates over time.

Laying out your borders

When it comes to laying out plants in your border, it helps to have a design to hand. This could be a simple sketch or, for bigger projects, a design you’ve created on a computer programme. Generally speaking, plants are placed out in groups of odd numbers, mostly 3s and 5s. This creates a natural effect, whereas pairing can look out of place, unless you are going for a formal aesthetic.

If you have plants in 9cm pots, you want to aim for 9 plants per square metre. This will offer dense planting that will establish quickly. You could plant less, but you will need to wait 2-3 years for these to establish. Bear in mind that some plants, like perennial geraniums, spread quickly, so you may only want 5 of these per square metre.

Place taller plants at the back or centre of borders and ground-covering plants toward the front. If you have some key plants, lay them out in drifts, to create a natural flow through the border. It helps to have groups of the same plant at certain points to help anchor the planting scheme. Once you’ve laid out all your plants in their positions, step back and make sure you’re happy. There are no hard rules, so if it feels right for you, plant away!

9cm Plants

9cm Plants

Shop now

Ground-covering plants

Ground-covering plants

Shop now

Pruning Hydrangea

For the best blooms, hydrangeas should be cut in early spring. How you cut them varies depending on which type you have, some flower on old wood and some on new wood.

Hydrangea arborescens (including H. ‘Annabelle’, which we have at Dorney Court) flowers on this year's growth so should be cut back hard between 20-50cm. If you cut very low, you’ll have fewer but bigger flowers, and if you cut higher then you’ll have an abundance of smaller flowers. I like to cut to around 30-40cm as this creates sturdy stems that will hold the large flowers better.

Hydrangea macrophylla & H.serrata (mopheads and lacecaps) flower on old wood, so you just need to cut the old flowerheads back to a healthy pair of buds. If you cut them hard, you’ll end up cutting off all the flowering material for this year. If you have a very old shrub, you can cut out 1-2 of the oldest stems to help rejuvenate the shrub.

Hydrangea paniculata (‘Limelight’, ‘Vanille Fraise’) — treat these very similarly to the arborescens group. Cut back to 20-30cm from ground level and back to a strong set of buds. Again, if you prune hard, you’ll get fewer but bigger flower heads, prune lighter and you’ll get more, smaller flowers.

Hydrangea quercifolia (oak leaf hydrangea) need minimal pruning and only light shaping. Any pruning of damaged branches should be done in summer, not spring. They flower on old wood, so try not to prune too hard if possible.

Hydrangea aspera (rough leaved hydrangea) require minimal pruning in spring, just to gently shape. They flower on old wood, and so pruning hard will remove flowering growth. They form large shrubs, so make sure you have the space to let them flourish.

Hydrangeas are generally long-lived plants, so by pruning correctly you’ll have many years of joy from them.

Wisteria pruning

It’s important to get wisteria pruning right to get the best flowering display from your plant. We’re lucky enough to have three large arches at Dorney Court that are dripping with wisteria blooms in late spring through to summer.

Ideally, you want to prune your wisteria in February, but you can also get away with it in early March, whilst your plant is still dormant. Prune back last year’s stems to two or three healthy buds. If you have a very old wisteria that needs drastic renovation, you can prune back main stems to buds lower down on the plant. Removing large branches will result in lots of leafy growth in spring, so be aware of this and only remove a third of the plant at a time.

Following the rule of pruning back to 2-3 buds in January/February and 5-6 leaves in July/August will keep your wisteria compact and free-flowering.

Wisteria

Ideal for smudging boundaries, adding height or creating shade and privacy.