|
By December the days are at their shortest, the sun is sinking lower day by day, and the garden is retreating having been pared back to almost nothing by low temperatures and long nights. Thankfully any evergreens are still radiating warmth and if you’re lucky enough to have a few glimmers of red - be it berry, haw or fruit - there’s still enough usually on the plants to enjoy, but with a winter container you can raise your spirits even more and improve your garden enormously. Follow a few basic rules and it will be a beacon of hope - greeting you and your visitors on the coldest day whether placed by the front door, or in another prominent sheltered spot.
Your Pot
Winter pots must be rugged in construction, frost proof and warm in order to shelter your plants. The best materials for insulation include wood, terracotta and stone or stone-like material. Opt for a sturdy shape with a wide top, not too tall or too tapered because these could blow over in winter winds.
Compost
The best compost for most shrubby plants is a loam-based John Innes No. 3 because it’s a heavier mix that will hold nutrients and water well. It will also weigh down the pot far more effectively than a lighter peat or wood based compost.
Choosing Plants
When planting a container you need variety of form and shape and plenty of plants because you are spacing them closer together than you would in the garden setting. It isn’t a waste of money however, for once you’ve selected your plants they will look good for many months and you can use them again. Once summer comes, you can move your pot into a shady corner and add some fertiliser (such as Vitax Q4) and then your plants can stay in that container for three years. After that time it’s best to break up the display and add the plants to the garden. In many ways a winter potful is far better value than a summer display which tends to get thrown away every autumn.
Go for Foliage
A good winter pot has to rely on foliage rather than flower so the first consideration is to opt for a theme. If you muddle up lots of different foliage (ie gold, silver and purple) it will look awful. The position may dictate your choice. If the prime position for your pot is in the shade, golden foliage will add extra radiance to a dank corner. Golden variegation will need lots of green support and will tend to go with blue and yellow flower. Silver variegation is cooler in tone and blends best with cool shades of pink and mauve. This combination looks good in wood and stone, but less so on orange-toned terracotta. Green foliage is very rich and the perfect foil for white flowers, or it can be mixed with red berries for an ornate festive container.
Leave Space for Flowers
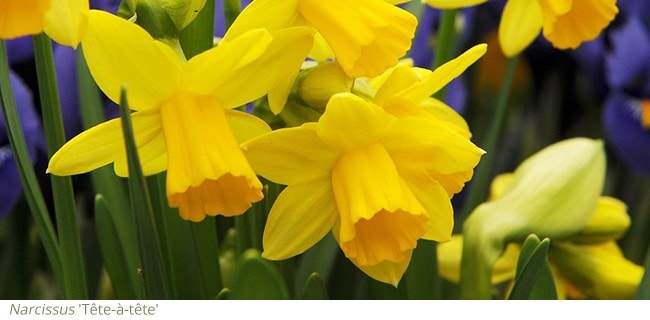
If you are planting up early enough, put in a base layer of bulbs. They wont appear until late winter or early spring, but they will be worth the wait. Miniature daffodils like 'Tête-à-tête' or Crocus would be perfect. Alternatively, add some small pots filled with seasonal flowers. Good contenders include anemones, snowdrops, dwarf irises and cyclamen. When they are ready to go in simply empty them from their pots and dot them around the edges. They can then be replaced after they have finished flowering, swapping them for something just coming into bud.
A Key Plant
Good containers have to have a key plant that unites the rest of the planting. It’s normally a shrub and it should be preferably placed to one side, rather than centrally. Your key plant will dictate your foliage theme.
Rich Green
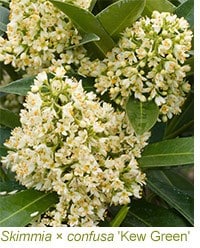 A mostly green potful could contain scented Christmas box (Sarcococca confusa) or a skimmia. Skimmia x confusa 'Kew Green' will provide you with conical heads of pale green buds followed by creamy flowers. The buds are just as choice as the flowers. Skimmia japonica 'Rubella' bears clusters of wine-red buds. If you want red berries opt for Skimmia japonica subsp. reevesiana. Viburnum tinus ‘Lisarose’, another good choice, has dainty white-flowers that emerge from red buds set above rich-green foliage. A mostly green potful could contain scented Christmas box (Sarcococca confusa) or a skimmia. Skimmia x confusa 'Kew Green' will provide you with conical heads of pale green buds followed by creamy flowers. The buds are just as choice as the flowers. Skimmia japonica 'Rubella' bears clusters of wine-red buds. If you want red berries opt for Skimmia japonica subsp. reevesiana. Viburnum tinus ‘Lisarose’, another good choice, has dainty white-flowers that emerge from red buds set above rich-green foliage.
Variegated Options
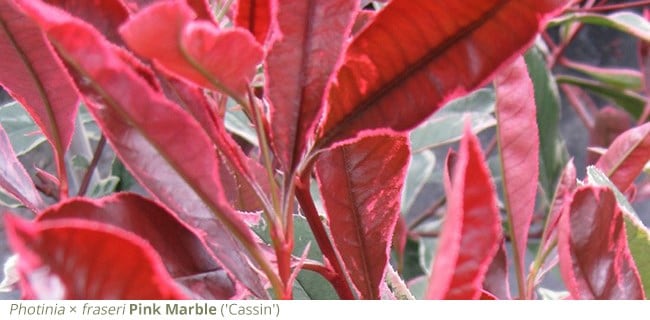
Use variegation sparingly. Hebe 'Red Edge’ and ‘Heartbreaker’ (with pink-toned silver and white foliage) are both excellent foliage plants in winter, although they must have a warm position to thrive. Aucuba japonica ‘Crotonifolia’ is a spotted evergreen that’s fast growing, so don’t use this unless there’s space. The new Photinia × fraseri Pink Marble (‘Cassin') has variegated green and cream foliage, but the young foliage is almost purple. Or you could use the cool Euonymus fortunei 'Emerald Gaiety’, an upright evergreen with small green leaves edged in white. Pieris 'Flaming Silver' is a pretty, compact variegated shrub for a pot in a shadier spot. The leaves in the spring are spectacular when they emerge a bright red, but in the winter, which is what we are interested in they are green with a strong silvery-white edging to brighten up most plantings. These are acid lovers so plant in an ericaceous compost to keep them happy.
For more drama opt for the large green and white leaves of Fatsia japonica 'Spider's Web’, an exotic sparkler more suited to cityscapes.
Add a Grass or Grass-like Plant
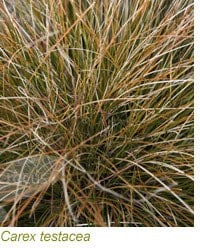 Grasses, sedges and grass-like plants with evergreen presence add fine lines and gentle curves and you can either use one or space them throughout the pot. Most carex are evergreen and the taller very wiry Carex testacea, which is great with pots of spring-flowering Anemone blanda, can be woven into a design, or will even stand alone as a specimen in a pot. The tightly-waisted swirl of olive-green to brown fine leaves has hints of orange so always adds some winter warmth. The spider-like yellow and green leaves of Carex oshimensis ‘Evergold' hug the ground, but placed at the edge of a pot they creep over, brightening up winter. A newer addition to the range is C. testacea 'Prairie Fire'. This grass is stunning through the winter months living up to it's name with masses of narrow coppery-orange foliage to add colour and movement to your pots. Place it in a sheltered spot to be appreciated and for protection. Grasses, sedges and grass-like plants with evergreen presence add fine lines and gentle curves and you can either use one or space them throughout the pot. Most carex are evergreen and the taller very wiry Carex testacea, which is great with pots of spring-flowering Anemone blanda, can be woven into a design, or will even stand alone as a specimen in a pot. The tightly-waisted swirl of olive-green to brown fine leaves has hints of orange so always adds some winter warmth. The spider-like yellow and green leaves of Carex oshimensis ‘Evergold' hug the ground, but placed at the edge of a pot they creep over, brightening up winter. A newer addition to the range is C. testacea 'Prairie Fire'. This grass is stunning through the winter months living up to it's name with masses of narrow coppery-orange foliage to add colour and movement to your pots. Place it in a sheltered spot to be appreciated and for protection.
The black foliage of Ophiopogon planiscapus 'Nigrescens' is fabulous in a pot and it can be teamed with cyclamen or pansies among many other things. It’s particularly good with silver-leafed forms of Cyclamen coum, the spring-flowering jaunty cyclamen that comes in shades of pink and white.
Skeletons
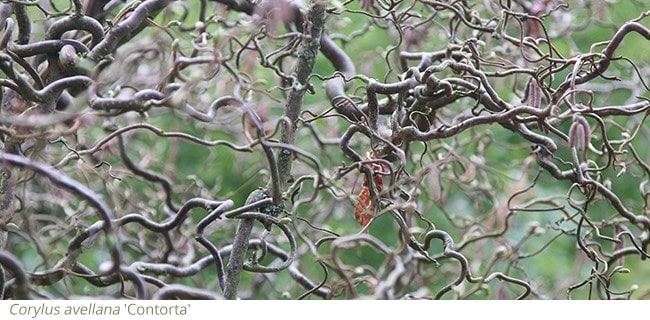
Coloured stems always work in a container because they add vertical presence, You can cheat. If you have a mature dogwood with red stems in the garden for instance (like Cornus alba ‘Sibirica’) you could cut some stems and plunge them into your container. Or you could use the stems of the twisted hazel, Corylus avellana ‘Contorta’. These brown corkscrews develop catkins which are held tightly in winter before unfurling in spring. Failing that buy a plant for your pot. Cornus sericea 'Flaviramea' has straight and substantial olive-green stems. Cornus sanguinea 'Midwinter Fire' bears flame-coloured stems and these work well with golden-variegated foliage.
More Stunning Foliage
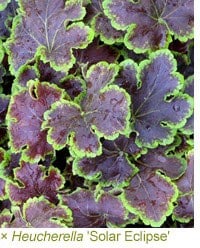 Heuchera and x Heucherella are highly useful because their foliage in unusual colours. x Heucherella ‘Solar Eclipse’ has burgundy-black scallops edged in emerald green. This would definitely flatter the black spiders produced by ophiopogon. Heuchera ‘Marmalade’ would give you ruffled leaves in shades of toffee apple and butterscotch and you could flatter this with Carex testacea, or use it with coloured stems such as Cornus sanguinea 'Midwinter Fire’. Heuchera and x Heucherella are highly useful because their foliage in unusual colours. x Heucherella ‘Solar Eclipse’ has burgundy-black scallops edged in emerald green. This would definitely flatter the black spiders produced by ophiopogon. Heuchera ‘Marmalade’ would give you ruffled leaves in shades of toffee apple and butterscotch and you could flatter this with Carex testacea, or use it with coloured stems such as Cornus sanguinea 'Midwinter Fire’.
Or you could add a dash of silver with Lamium maculatum 'Beacon Silver', which has frosted foliage and often bears very early flowers in vivid pink. It will droop itself over the edge of the pot almost as well as ivies do. Evergreen euphorbias also work well and Euphorbia × martini is a handsome mid-green euphorbia a touch of red on the leaves. Cut this back hard every spring - taking care not to splash yourself with the latex sap which can irritate eyes and skin.
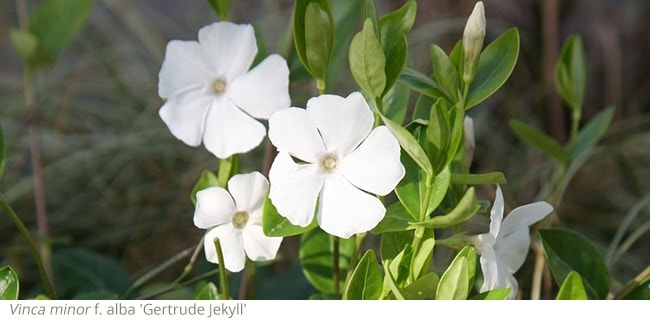
Ferns that keep their fronds throughout the year can well work too, and the most rugged is Polypodium vulgare, a fern with simple leathery leaves. Mix these with plain-green ivy and white Christmas roses (Helleborus niger) or the beautiful double form Helleborus niger Harvington hybrids double-flowered. Add a small periwinkle (Vinca), such as the blue-flowered and green-leafed Vinca minor 'Bowles's Variety'’ or the subtly variegated 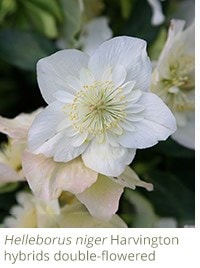 'Ralph Shugert’ because these tumble in a similar way to ivies and give you spring flower. There is even a white-flowered one with green foliage named ‘Gertrude Jekyll’. 'Ralph Shugert’ because these tumble in a similar way to ivies and give you spring flower. There is even a white-flowered one with green foliage named ‘Gertrude Jekyll’.
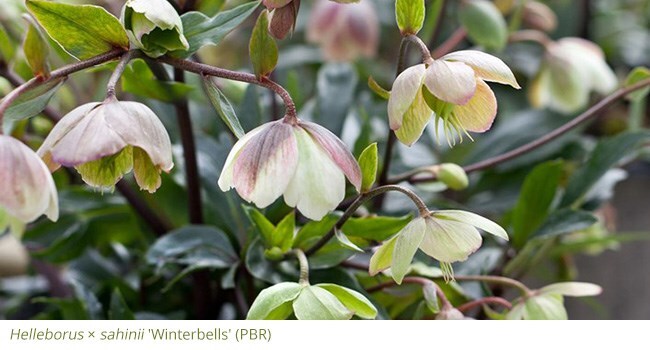
There are also double forms of Christmas rose such as the beautiful Helleborus niger Harvington hybrids double-flowered, with its gorgeous double white bowl-shaped flowers on strong upright stems. Also there is new highly desirable hybrid, Helleborus × sahinii ‘Winterbells' which is a cross between the Christmas rose (Helleborus niger and H. foetidus) Masses of delicate, nodding, small pink-flushed-green flowers are held on slender stems above deep green foliage. Looks gorgeous planted in containers, but keep it simple for a stylish contemporary look and plant them on their own.
If big is better for you then Helleborus × ballardiae 'Candy Love’ is a stunner. The flowers can be up to 8cm across so no shrinking violet here! From January to April the flowers open a creamy white, slowly changing to apricot, through to pink and then to a dusky purple as they mature, so you could have all these tones at one time on your plant.
Potting Up
Start off by placing your key plant on the ground and arrange your chosen plants around it roughly in the shape of the container. Look at each plant individually and make sure that the plant is showing its best side. Most plants have a ‘back’ and a ‘front’ and it’s important to place it the right way round.
Fill the container about two thirds full. Remove the key plant from its pot by pressing firmly on the pot base and gently upending it. Check the root ball: if the roots are potbound, gently tease them out and straighten them.
Position the key plant in the compost in a central position (it doesn’t have to be completely in the middle), with the top of the root ball 1cm below the rim of the pot. Insert bulbs now if you are using them (pointy side up) and arrange the other plants quickly - to avoid damaging foliage. Then carefully backfill with compost before watering well.
In a few days your plants will settle into their new space, so don’t worry if they look a little ‘plonked in’ to start with. |