


SETTING OUT THE SITE
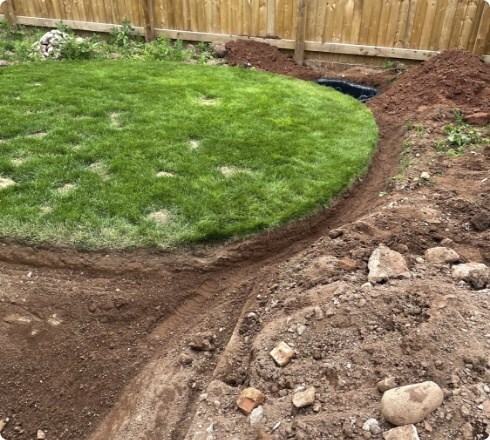
In week one you sketched out your existing garden layout, and for many, the temptation is to follow that footprint and line the edges of the garden with a border or two, while leaving the lawn or patio in the middle. This design works for some, but you may want to think a bit more creatively, and consider softening your lines - or widening sections of your borders to fragment straight lines, while giving more room to plant.

If you have a long narrow garden, you can break up the space and make it feel wider by introducing horizontal or diagonal interest. This could be done by creating new borders that come out into the centre of your space, or by adding a deep curve to an existing one.
If however your garden is short and wide, the opposite is the case, so try adding a focal point (an arch, obelisk or statue) that will draw the eye towards the back of the garden and create a feeling of depth. Also, consider using borders to break it up into different zones - perhaps creating a long lawn or patio that leads away from the house, with more secluded spaces for seating/eating or working.
If, like many, your shed is at the bottom of the garden, the Roman route would be a straight path from your back door to your shed. Adding in some curved lines however will play with the eye line, while giving you the opportunity to form softer border edges - and bring more planting into your space. After all, adding a couple of extra seconds onto your walk to the shed is no bad thing when you have a beautiful garden to enjoy!

There's also a lot to be said for not revealing everything all at once. Making the eye work to take in the garden gives a sense of discovery and space that can be achieved even in the smallest of urban spaces.
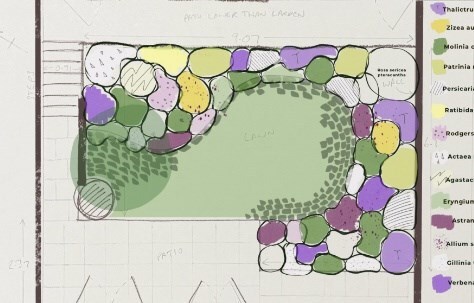
DECIDE ON THE PLANTING
Once you have the borders marked out, then you can start deciding what to fill them with - and for most of us, this is where the fun really begins. Keeping in mind what you've learnt about your garden's soil type/aspect etc (week 1) and the overall style you'd like to achieve (week 2), use our plant search to create a shortlist of your favourite (suitable) plants.
When planning where to place them, keep in mind their eventual height and spread, making sure there's enough space around them - and to avoid less vigorous plants getting swamped, you'll also need to take their growth rate into consideration. Traditionally taller plants are placed near the back with smaller plants at the front, and while this rule can still apply, more contemporary planting schemes often blend plants with different heights together, creating movement, depth and intrigue throughout the border.
CROCUS TIP
Map out the proposed border edges with a garden hose or some coloured string, then walk around the garden to see how it feels. Also, go inside and have a look at it from lots of different angles - if it needs tweaking then do it before you start to dig.
SMALL GARDEN DOESN'T MEAN SMALL PLANTS

If your garden or patio is on the small side, it can be tempting to scale everything down, peppering it with a selection of pint-sized pots and ornaments. This however can actually make the space feel cluttered, so opt instead for just a few statement pieces. Just two or three big planters filled with some taller evergreen shrubs (and perhaps coupled with a wall-mounted water feature), will create a simple yet stylish arrangement that epitomises the look and feel of a tranquil oasis in a larger garden.
CROCUS TIP
The art of repetition
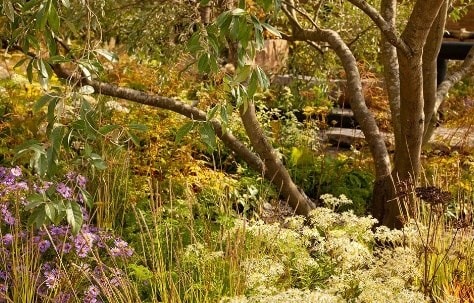
Garden designers achieve harmony and rhythm in their planting schemes by selecting 1 or 2 core plants (ideally ones that flower at different times of the year), and weaving these through every border. Ornamental grasses are good for this because they'll also add movement, but you could also use any of your favourite perennials, planting them randomly in naturalised drifts, or oddly numbered clusters.

WHAT SIZE SHOULD MY BORDER BE?
A common mistake we see when planning a new border is to make it too narrow, so to give enough space to vary the plant layout, aim for a minimum depth of 50cm. If you are planning to add some raised beds, you also need to make sure there is sufficient height for the plant's roots to spread out and get established. If these are to be placed on top of a hard surface, then anything less than 30cm in height would be fine for annuals and smaller perennials, but they probably won't be deep enough for larger-sized shrubs.